
This tutorial will walk you through the creation of a simple Breakout clone using the Pygame Python module.
Breakout is a simple Pong-like game where you control a paddle and bounce a ball around the screen to destroy all the blocks.
By the end, you’ll have a fun, playable game, and the knowledge to start creating your own games.
I am assuming that you have some background with Python but I am not assuming that you have any experience with Pygame or game programming of any kind.
I will also assume that you have a working Python 3 environment and access to a command line and text editor.
Pygame is a Python wrapper of SDL (Simple DirectMedia Layer), a platform-independent graphics library that provides access to your computer’s audio, keyboard, mouse, screen, etc. This means that the games you write using Pygame will be able to run on any operating system.
Table of Contents
Installing The Pygame Package
To install Pygame open your command line and run:
python3 -m pip install pygameAfter this command finishes, run the following to check if the installation succeeded.
python3 -m pygame.examples.aliensIt should launch one of the example games that is packaged with Pygame. If these steps are not working, check Pygame’s documentation for more installation tips.
Now that you have Pygame installed we can start writing the game. The rest of this tutorial will consist of code snippets and then an explanation of how the code snippets work.
Follow along by adding each piece of code to your own Python script, and by the end, you’ll have the complete game.
You can just copy-and-paste each section, but I would suggest actually typing each line yourself to gain a deeper understanding of what is going on.
Like most Python programs, this one starts by importing the modules that we will need.
import pygame
from pygame.locals import *
from pygame.math import Vector2 as v2
import random, sys
We imported pygame, obviously, as well as random and sys from the standard library (you’ll see why these are needed later). We also add pygame.locals to our namespace as it contains commonly used helper functions, and create v2 as a convenient alias for pygame.math.Vector2.
Using The Sprite Class
To play Breakout, we are going to need a paddle. In Pygame, game objects are referred to as sprites. A sprite has both an image, which will be drawn to the screen to render it, and a position, which defines where the image will be drawn.
To help us write less code, Pygame provides a sprite class that we can inherit from. This way, we only need to add the behavior that is unique to our sprite, and not worry about writing boilerplate code.
Creating The Paddle
We can create our paddle class with the following:
class Paddle(pygame.sprite.Sprite):First, we need a way to create new paddles, so let’s add an __init__ method.
def __init__(self, width, height, speed, center, color, screen):
    pygame.sprite.Sprite.__init__(self)
    self.image = pygame.Surface((width, height)).convert()
    self.image.fill(color)
    self.rect = self.image.get_rect()
    self.rect.center = center
    self.speed = speed
    self.vx = 0
    self.bounds = screen.get_rect()
To create a new paddle, we need to know its dimensions, how fast it can move, where to put it, its color, and a reference to the screen on which it has been drawn (we’ll see why we need this later).
Before we can do anything with our sprite, we need to call pygame.sprite.Sprite’s __init__ method. This populates some internal states so that Pygame can work with our sprite.
Remember how I said sprites have an image and a position? Pygame expects the image to be a Pygame surface stored in self.image and the position to be a Pygame rectangle in self.rect (think of the rectangle as storing the coordinates of the bottom-left and top-right corners of the image).
First, we create the image. We can call pygame.Surface to create a blank image with the specified dimensions (the call to the convert method ensures that this image is stored in the format that the computer’s display expects, speeding up rendering).
We now call the fill method of our image to give it the color that we want.
Next, we need to create the rect. We start by calling the get_rect method on the image in order to get a rectangle with the size of the image.
Then, we assign its center to move it to where we want the paddle to start.
Finally, we set some attributes that, while not used directly by Pygame, are going to be used by our own code. We store the speed of the paddle in self.speed, the current velocity is in self.vx (remember, the paddle only moves in the x-direction), and the bounds of the screen are in self.bounds (notice how we again use the get_rect method to get a rectangle from a surface).
Moving The Paddle
Once we have a paddle, we are going to want to move it. The following methods will help us do just that:
def move_left(self):
    self.vx = -self.speed

def move_right(self):
    self.vx = self.speed
In Pygame’s coordinate system, positive-x points are located to the right while negative-x points are located to the left. Therefore, to move left, we set the velocity to the negative speed. To move to the right, we just set the velocity to speed.
While it’s fun to move, we also have to stop, otherwise, it would be very hard to control the paddle!
That is what these next two methods are for:
def stop_left(self):
    if self.vx == -self.speed:
        self.vx = 0

def stop_right(self):
    if self.vx == self.speed:
        self.vx = 0
Their implementations may seem a little confusing. Why don’t we just set the velocity to 0?
Well, stop_left means stop the paddle if it is moving left. The same goes for stop_right. Therefore, these methods need to first check if the paddle is moving in the appropriate direction, and then set the velocity to 0 if either condition evaluates to True.
We know that Pygame will look at the image and .rect attributes when rendering a sprite. There is also a method that Pygame will call (if it is present) named update. The update method is responsible for updating the state of the sprite with each frame.
Here is the implementation for our paddle:
def update(self):
    self.rect.move_ip(self.vx, 0)
    if not self.bounds.contains(self.rect):
        self.vx = 0
As you can see, it is quite simple. First, we move by our current velocity in the x-direction, using the move_ip method of the rectangle to move by an x- and y-offset (in-place, hence the _ip).
Next, we check to see if we have hit the side of the screen (by checking if the bounds of the screen no longer contain our rectangle). If that is the case, we set the velocity to 0 so that the player cannot move the paddle off the screen.
Creating The Ball
Along with a paddle, we are going to need a ball to play Breakout. Like the paddle, the ball will be a sprite:
class Ball(pygame.sprite.Sprite):We will need an __init__() method.
def __init__(self, radius, velocity, center, paddle, blocks, color, screen):
    pygame.sprite.Sprite.__init__(self)
    self.image = pygame.Surface((radius * 2, radius * 2)).convert()
    self.image.fill("white")
    self.image.set_colorkey("white")
    pygame.draw.circle(self.image, color, (radius, radius), radius)
    self.rect = self.image.get_rect()
    self.rect.center = center
    self.v = v2(velocity)
    self.bounds = screen.get_rect()
    self.paddle = paddle
    self.blocks = blocks
    self.screen = screen
It takes the radius of the ball, its velocity (which has both x and y components, unlike paddle), its initial position, a reference to the paddle that will hit it, a reference to the blocks which it will destroy, a color, and a reference to the screen.
Just like we did for the paddle, we need to call pygame.sprite.Sprite’s __init__ method.
Next, we’ll create the image for the sprite. Unlike the paddle, which is just a rectangle, we want the ball to appear as a circle.
Since images are always rectangles, this means that we need to create a rectangular image on which we draw a circle. We create a large enough surface (with a width and height of twice the radius) then fill it with white.
Next, we’ll tell Pygame that when rendering this image it should treat white pixels as transparent, and not draw them (this is done using the set_colorkey method). This allows us to draw a circle on our image (using pygame.draw.circle) and have it be the only thing that Pygame draws while rendering our image (as long as the circle is not white, in which case it will not appear at all).
Making The Ball Bounce
We create our bounding rectangle to tell Pygame the position of our sprite in the same way that we tell Pygame the position of the paddle. We then store the velocity, bounds of the screen, paddle, blocks, and screen as attributes (since they will be needed later).
Unlike the paddle, the ball does not need any methods to directly control its motion. However, it still requires an update method.
def update(self):Since the ball needs to do more than stop if it gets out of bounds, this method is a little more complicated than for the paddle.
if pygame.time.get_ticks() < 3000:
    return
First, we return early if less than three seconds have passed since the game launched (we check the time since startup with pygame.time.get_ticks, which returns a value in milliseconds). This gives the player some time to get ready before the ball starts bouncing around.
Next, we will move in the x-direction, using the same move_ip method as above to shift our bounding rectangle. Since we have both an x- and y-component to our velocity, you may be wondering why we don’t just move by both at once.
Well, if we did so and then collided with an object we wouldn’t know if we hit the object on the sides or the top or bottom. If we don’t know where we hit the object, we don’t know how to move the ball in response (do we turn around in the x or y direction?).
Therefore, it’s easiest to move first along the x-axis then along the y-axis, so that we know what type of collision has occurred.
self.rect.move_ip(self.v.x, 0)
if not self.bounds.contains(self.rect) or pygame.sprite.spritecollide(self, self.blocks, True):
    self.v.x = -self.v.x
    self.rect.move_ip(self.v.x, 0)
Now that we have moved in the x-direction, we’ll check to see if we have hit the edge of the screen (using the same method as before) or if we have hit any of the blocks. To check if we have hit any of the blocks, we use the pygame.sprite.spritecollide method.
It takes a sprite (in our case the ball, or self) and checks if it hits any of the sprites in a certain group (the blocks, or self.blocks). As its last argument, it takes a boolean that tells it whether or not to delete the sprite(s) that are hit.
We pass True, since we want to remove blocks that are hit by the ball. If we do hit the boundary or a block, we reverse our velocity in the x-direction and then move with our new velocity.
Why move? To avoid getting stuck forever inside of an object we want to move out of it before update is called again.
The code for handling movement in the y-direction is very similar:
self.rect.move_ip(0, self.v.y)
if not self.bounds.contains(self.rect) or pygame.sprite.spritecollide(self, self.blocks, True):
    if self.rect.bottom > self.bounds.bottom:
        write_and_quit(self.screen, "You Lost! :(")
    self.v.y = -self.v.y
    self.rect.move_ip(0, self.v.y)
There is one twist, however.
If we hit the bottom of the screen (if the bottom of the ball, self.rect.bottom, is below the bottom of the screen, self.bounds.bottom), the player has lost the game. We write a message to the screen and quit (the write_and_quit function will be shown later).
Finally, we need to handle collisions with the paddle. This is different from hitting the side or a block since we don’t want to bounce off the paddle normally.
Instead, we want the ball to bounce directly up if it hits near the center of the paddle and bounce more to the side if it hits near an edge. This behavior is common in Breakout-like games as it gives the player control over where the ball goes.
if pygame.sprite.collide_rect(self, self.paddle):
    angle = -90 + 120 * (self.rect.centerx - self.paddle.rect.centerx) / self.paddle.rect.width)
    self.v.from_polar((self.v.magnitude(), angle)
We can check if we hit the paddle using the pygame.sprite.collide_rect method, which checks if two sprites collide.
To compute what angle we want the ball to exit with, we first find out how far we are from the center of the paddle (self.rect.centerx – self.paddle.rect.centerx) and divide that by the width of the paddle (self.paddle.rect.width).
This will give us a value ranging from -1/2 (if we hit the left edge of the paddle) to +1/2 (if we hit the right edge). Next, we multiply this by 120 degrees, giving us a range of angles from -60 to +60 degrees.
In Pygame’s coordinate system, -90 degrees points directly upwards. Since we want that to be the case when the ball hits the center of the paddle, we must add -90 to the value we just computed. To give the ball this angle, we use polar coordinates.
It’s not really important how they work, we just need to know that the first term is the length of the vector and the second term is the angle. Therefore, we can set our vector from the polar coordinates (using the from_polar method) (self.v.magnitude(), angle).
Now that you’ve seen the sprites for our paddle and ball, the implementation of blocks will seem very straightforward.
class Block(pygame.sprite.Sprite):
    def __init__(self, rect, color):
        pygame.sprite.Sprite.__init__(self)
        self.rect = rect
        self.image = pygame.Surface(rect.size).convert()
        self.image.fill(color)
Since the blocks never move, all we need is an __init__ method that sets up their image and position. A block is initialized by directly passing the rectangle we want it to occupy and its color. We store the rectangle in the rect attribute like always, and then create an image and fill it with the desired color. That’s it!
Before we get to the main game loop, we have one helper function to introduce: write_and_quit, which we saw being used in the ball’s update method to tell the player they lost.
Here’s its implementation:
def write_and_quit(screen, message):
    font = pygame.font.Font(None, 36)
    text = font.render(message, True, "black")
    textpos = text.get_rect(centerx=screen.get_width() // 2, centery=screen.get_height() // 2)
    screen.blit(text, textpos)
    pygame.display.update(textpos)
    pygame.time.wait(3000)
    sys.exit()
As you can see, it takes a screen to write on and a message to display.
To render text in Pygame, we need a font. By calling the pygame.font.Font constructor with None we will get the default system font. The next argument, 36, defines the font size. We can then write our message by calling the render method of the said font.
The render method takes a string, a boolean telling it whether or not to use antialiasing (a way of making the text smoother), and the color of the text.
Before we put this text on the screen, we need to define its position. We do so by getting the rectangle of the text and then moving it to the center of the screen. Now we can render the text at this position by calling screen.blit, and then update the display using pygame.display.update.
Note that we pass the bounding rectangle of the text to pygame.display.update. This tells Pygame that it only has to redraw the part of the screen where the text is being drawn, which both saves time and doesn’t erase the background.
Next, we’ll sleep for 3 seconds. You may be used to using the time.sleep method in Python to do something like this. While using Pygame, this method doesn’t work, as it messes up Pygame’s internal functionality. Instead, we must call pygame.time.wait with how many milliseconds we want to sleep.
After sleeping (and giving the user time to read the message), we quit the program using sys.exit.
Now that all the required sprites and helper functions have been introduced, we are ready to write the body of the game. To help organize the code, we will put it in a main function:
def main():First, we need to do some basic setup.
pygame.init()
screen = pygame.display.set_mode((600, 600))
pygame.display.set_caption("Breakout")
pygame.mouse.set_visible(False)
This code initializes Pygame, creates a 600×600 pixel screen, sets the title of the window, and makes the move invisible within said window. Next, we need to give the screen a background:
background = pygame.Surface(screen.get_size()).convert()
background.fill("white")
This code creates a surface the size of the screen and then paints it white. Now, let’s render this background.
screen.blit(background, (0, 0))
pygame.display.flip()
This draws the background (using screen.blit, just like in write_and_quit) and updates the display. We can just use pygame.display.flip to update the entire display here since the background fills the whole screen.
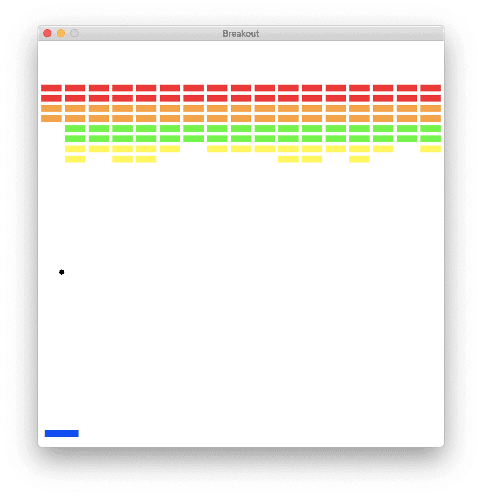
Now that we have a window rendered with a background, it’s time to create our sprites. First, let’s make a paddle.
paddle = Paddle(50, 10, 5, (screen.get_width() // 2, screen.get_height() - 20), "blue", screen)We want it to be 50 pixels long, 10 pixels tall, have a speed of 5, be in the center x-wise and just off the bottom, and be colored blue. Creating the blocks is a bit more tedious.
block_width = 30
block_height = 10
block_padding = 5
block_top_offset = 60
colors = ("red", "orange", "green", "yellow")
n_rows = len(colors) * 2
blocks = pygame.sprite.RenderPlain(
    Block(
        Rect(left, top, block_width, block_height),
        colors[int(len(colors) * (top - (block_padding + block_top_offset)) / ((block_height + block_padding) * n_rows))],
    )
    for left in range(block_padding, screen.get_width() - block_width, block_width + block_padding)
    for top in range(block_padding + block_top_offset, (block_height + block_padding) * n_rows + block_padding + block_top_offset, block_height + block_padding)
)
Let’s break that down.
First, we have some parameters: the width and height of each block, the padding in between them, and how far down from the top the blocks start. We also have a tuple of colors for the rows of blocks and want to have 2 rows for each color (hence n_rows = len(colors) * 2)).
Then we create the blocks as a group of type pygame.sprite.RenderPlain. What does that mean? In addition to sprites, Pygame has groups, which are a collection of sprites that Pygame manages for you.
For example, Pygame will render all the sprites in the group together, or let you collide a sprite with an entire group (like we did with pygame.sprite.spritecollide in the ball’s update method).
pygame.sprite.RenderPlain is a basic group object that will perform the above functions.
To create a group, you pass all the sprites you want in the group. We use a generator expression to generate all the blocks that we want. We loop over the x-coordinates (the left side of the block) and then the y-coordinates (the top side of the block).
We then create a block at those coordinates with the specified width and height, along with a color that corresponds to which row it is in. For example, with the current parameters, the top two rows will be red, the next two orange, etc.
Now we have one more sprite remaining; the ball.
ball = Ball(4, (5, 5), (30 + random.randrange(0, screen.get_width() - 60), screen.get_height() // 2), paddle, blocks, "black", screen)Our ball will have a radius of 4, an initial velocity of (5,5), a random x-position, a y-position in the middle of the screen, references to the appropriate objects, and be black.
Now we create one more group of sprites.
allsprites = pygame.sprite.RenderUpdates((paddle, ball, *blocks))Per its name, this group references all our sprites so that we can render them all at once.
Note how instead of a RenderPlain, it is a RenderUpdates group. This means that when we render this group, it will return a list of regions of the screen that have been updated.
This is very useful since we can then use these regions to (only) redraw the portions of the screen that have been changed, making our animation much faster and more efficient.
Before we get into the main loop, we need one more thing, a clock that will help us render our game at a consistent framerate.
clock = pygame.time.Clock()Now for the main loop.
Since the game will keep running until write_and_quit is called (in turn calling sys.exit), we want this to be an infinite loop:
while True:First, with each frame, we need to process any inputs from the user. In Pygame, this is done by checking for any new events, like so:
for event in pygame.event.get():There are different types of events that we want to handle differently. If the user closes the window, this generates a QUIT event.
if event.type == QUIT:
    return
This returns from the main function if the window is closed, terminating the program. If the user presses a key, we have a KEYDOWN event.
elif event.type == KEYDOWN:
    if event.key == K_LEFT:
        paddle.move_left()
    elif event.key == K_RIGHT:
        paddle.move_right()
If they press the left arrow key, we start moving the paddle to the left. If they press the right arrow key, we start moving the paddle to the right. In addition to keypresses, we need to support the user while releasing a key, which creates a KEYUP event.
elif event.type == KEYUP:
    if event.key == K_LEFT:
        paddle.stop_left()
    elif event.key == K_RIGHT:
        paddle.stop_right()
If they release the left arrow key, we stop moving left. If they release the right arrow key, we stop moving right.
For our simple game, these are all the events that we need to handle. After processing events, however, we need to call:
pygame.event.pump()This allows Pygame to do internal processing to keep the event system running.
Next, we need to update and render our sprites. Thanks to the groups and sprites that we have created, these are only three simple lines.
allsprites.clear(screen, background)
allsprites.update()
pygame.display.update(allsprites.draw(screen))
First, we clear the screen and replace it with the background (only where the sprites were last). This ensures that we won’t see e.g., a trail of the ball left behind when it moves.
Next, we call the update method of the allsprites group. This calls the update methods of each of the individual sprites, performing all the movement and collision handling that we detailed for the paddle and ball sprites.
Finally, we draw the sprites and update the display only where we have to, using the special functionality of a RenderUpdates group as detailed above.
You may notice that we haven’t given the player a way to win yet! We’ll do so here:
if len(blocks) == 0:
    write_and_quit(screen, "You Won! :)")
This checks if there are no more blocks remaining, and if so tells the player that they have won.
Finally, we end each iteration of the main loop like this
clock.tick(60)This ensures that we don’t run at more than 60 frames per second, keeping the animation of the game smooth.
Finally, we end the program with the standard Python idiom of:
if __name__ == "__main__":
    main()
This calls the main function if the program is being run (e.g., from the command line) but not if it is being imported by another program.
You can now run the code just like you would any other program, e.g., with:
python3 breakout.py # or whatever you named your fileYou’ve done it!
At this point, you have written a fully functional Breakout clone.
Unhappy with the gameplay or appearance?
Thankfully, you can change anything you want. A larger paddle, more bricks, faster ball, better colors, etc. are all just a few edits away.
If you want to make some more substantial changes (and learn more Pygame), here are some ideas:
- Add a system to keep score (e.g., track how many blocks have been destroyed). You will need to introduce a variable to hold the current score and use the text rendering techniques demonstrated in write_and_quit to display the score with each frame. You will need to update the score every time a block is hit.
- Make some blocks harder to destroy. In real Breakout, some blocks take more than one hit to destroy. You would have to give each block a variable representing its “number of hits left,” and instead of destroying blocks using the spritecollide function, destroy them manually when they have no more hits left. Hint: calling the kill method of a sprite will destroy it and remove it from any groups it is a part of.
- Add powerups. You could take this in various directions. Maybe the ball gets faster as it hits more blocks, or the paddle gets slower if you hit a specific block. Be creative!
Conclusion
Hopefully, you have come away from this tutorial with a fun game to play and a basic understanding of Pygame.
If you want to learn how to create more complicated games with Pygame, check out its documentation. There are some great tutorials that cover topics I didn’t have time to delve into here, along with detailed documentation for each of the classes and functions included with Pygame.
Happy coding!